This ‘cake’ isn’t as sweet as most cakes and is a great snack. The apples add a little crunch, while the raisins make it chewy and flavorful. A family recipe, with a few little alterations.
I personally love this apple cake and used to make it often, but it’s become scarce. Luckily, that makes it a real treat!😋🍎
Ingredients:
1 cup flour
½ cup butter (dissolved)
1 cup sugar
3 eggs (separated)
1 cup milk
2 apples (preferably Granny Smith)
1 cup raisins
1 tablespoon rum
Directions:
Soak raisins in rum 1 hour before baking cake.
Separate egg yolks from egg whites.
Mix flour, sugar, milk and egg yolks in a medium-sized bowl to make a smooth batter.
Actually I made this weeks ago, but suddenly decided to write about it.
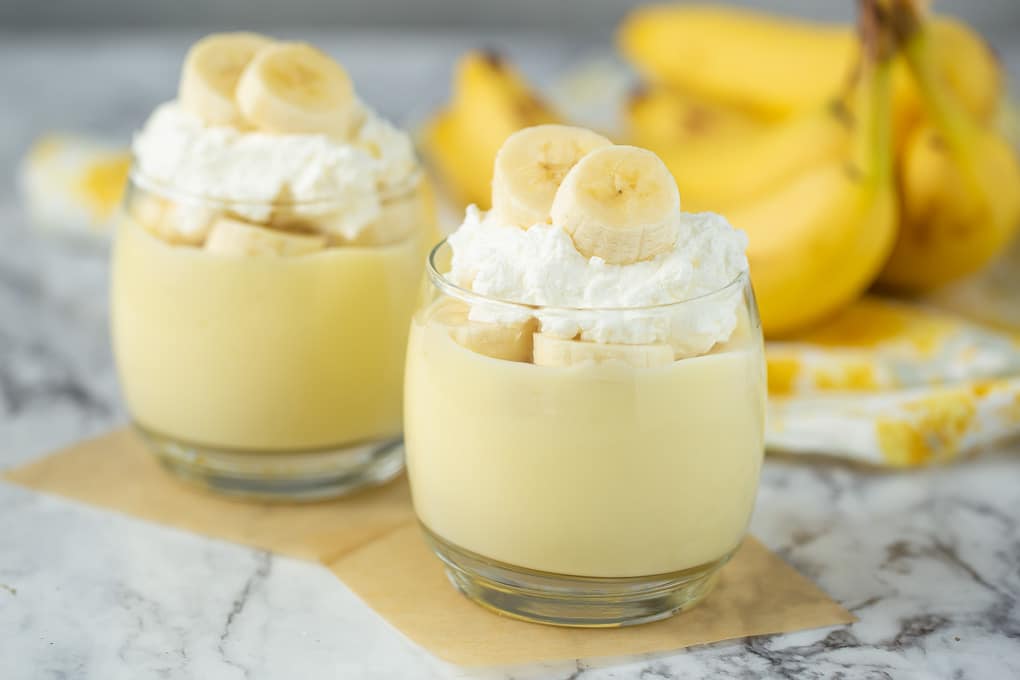
Anyone who knows me knows I love barbecue. But at most joints, they have banana pudding. What’s wrong with that? IT’S NOT FRESH BANANA PUDDING!!! It’s canned with fresh bananas and wafers.
One of my best friends LOVES banana pudding, but she gets the Jello-brand stuff. So I decided to make REAL banana pudding. I was going to make homemade wafers too, but that’s just too much work. 😅
BANANA PUDDING RECIPE from Classic Home Desserts by Richard Sax
2 1/2 cups milk
1/3 cup plus 3 tablespoons sugar
2 large eggs
1 large egg yolk
1 tablespoon unsalted butter
2 teaspoons vanilla extract
2 firm-ripe bananas *not plantains
1 box Vanilla Wafers
Pour 1/2 cup of the milk into a bowl; add the 1/3 cup sugar, the eggs, egg yolk, and cornstarch. Whisk until smooth; set aside
In a small, heavy saucepan, combine remaining milk and remaining sugar. Bring almost to a boil over medium heat.
Whisking constantly, slowly pour the hot milk into the egg mixture. Return the mixture to the saucepan, and bring to a boil, whisking constantly. Lower heat and boil gently, whisking constantly, until thickened and smooth, about 2 minutes. Immediately remove the pan from the heat.
Strain the custard into a clean bowl. whisking in the butter and vanilla.
Spoon a little of the custard into your serving bowl, and layer custard, banana slices, and wafers.
Refrigerate for several hours. Serve cold. Top with whipped cream if desired. ENJOY!
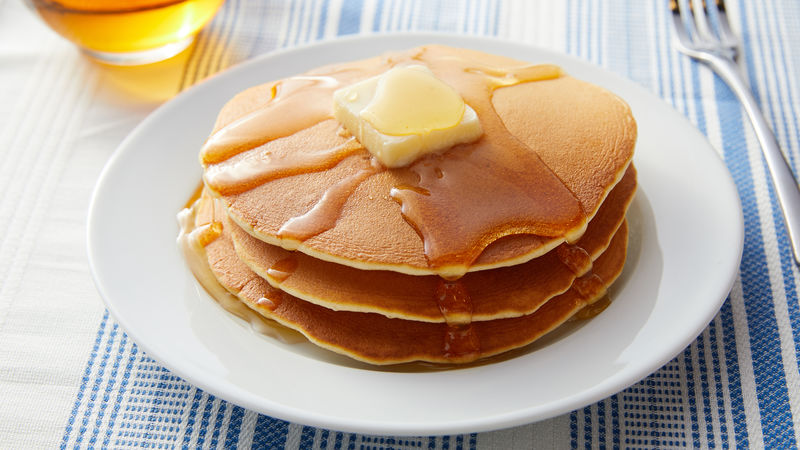
There’s something so beautiful about a thick stack of pancakes, sitting on a plate, drizzling with maple syrup and oozing with melted butter, waiting for you to dig into them, yelling at you “Look at me, I’m delicious!”
A couple years ago, my Dad wanted perfect fluffy pancakes. So what did he do? He made his own recipe for thick, fluffy, pancakes.
My Dad’s Perfect Pancake recipe
1 1/2 cups flour
1/2 cup sugar
1 egg
2 teaspoons baking powder
1 tablespoon oil
1 1/2 cups milk
Mix dry ingredients.
Mix wet ingredients.
Combine.
Heat up the pan to medium-high and DON’T BUTTER THE PAN!!!!
Once the pan is hot, pour a little of the batter on to test if it’s hot enough.
If it’s too thin, add more flour.
Scrape pan well, to make sure there’s no burnt parts.
Pour another cake, making sure to scrape in between cakes.
Once the bubbles come to the top, flip it. It’ll splatter. If it doesn’t, it won’t be as fluffy.
Mass production!
If you have your own pancake recipe, don’t mind that it says ‘perfect’ up there. You’ll probably disagree with that bold statement.
I love pancakes, even more than waffles, and if you have fresh blueberries or strawberries, THROW EM ON THERE!!! Unfortunately, we don’t really have fresh berries on hand, so I don’t get this luxury much.
Mousse. A fancy, simple dessert. Somehow, I actually was able to make it without messing up. Despite that fancy French name, it’s basically just a puree/ganache and whipped cream. I looked it up, and “mousse” in French actually means “foam”.
Anyway, a couple days ago, I tried Dominique Ansel’s recipe for chocolate mousse. Miraculously, it worked out and I didn’t completely flunk (like I do with the simple stuff…). Only thing was, it was bittersweet chocolate and no sugar at all, so I had to whip up some whipped cream to top it. It was great and all, but I wanted to get deeper into the world of Mousse.
The day after, I was wondering what other flavors of Mousse I could try. I decided to google Strawberry Mousse. The first recipe that popped up was https://anitalianinmykitchen.com/strawberry-mousse/. I liked the recipe and thought I would take the idea of pureeing the strawberries and use Dominique Ansel’s recipe for measurements and stuff. Anyway, it worked:
Alright, so most of you saw my Meringue Mishaps post, right? Good, ’cause that story basically happened again yesterday. It started with a super-complicated super-exact recipe for kue semprit sagu, a tapioca cookie from Indonesia:
Kue Semprit Sagu
100 grams tapioca starch
50 millilitres sweet condensed milk
70 grams softened butter
Mix butter with sweet condensed milk.
Once combined, add Tapioca Starch slowly, in two additions. Mix until almost same consistency as a cookie dough.
Pipe with a star tip, and bake at 300 F for 15 minutes. DON’T USE PARCHMENT PAPER. BAKE DIRECTLY ON THE PAN FOR EXTRA CRISPINESS.
Super complicated, right? Seriously, I was sure there was NOTHING that could go wrong. But of course, something has to go wrong, because that’s the way I bake. Perfection cannot be repeated.
They’re cute little swirls!
First Attempt:
Like meringues, my first attempt was near to perfection. Only problem was, there were not enough. “I want a mountain of ’em. So much that I have to eat my way out!” Dad complimented. So I began mass production.
Second Attempt:
For the first attempt, someone had conveniently left out some butter so it became soft enough for me to use. It was only one stick, so after I used it, I had to soften my own for Mass Production. Unfortunately, I hadn’t figured out that the Microwave is evil to butter unless used with very short bursts (less than 5 seconds each). So decided to quadruple (x4) the batch. We didn’t have enough butter for that, so I had to defrost some as well. I made a mistake here. I decided that I would soften the butter from the fridge, then in a separate bowl do the frozen one. Well, the butter from the fridge turned out just fine, but because the second one was from the freezer, I thought that I should microwave it longer. So I did. I set the thing to 30 seconds and let it run. When I took the butter out, it was soft. So soft, that it had a pool under it. Yep, I half-melted it. That was the big mistake. It piped okay, and seemed fine until I baked it. After a couple minutes in the oven, butter was wetting the parchment paper. Not entirely sure why, but I think it has to do with all the butter and how the melted-butter didn’t like the heat or something. But I think the Evil Microwave was the biggest reason for this fail. So the cookies were fine, but not crispy enough. I used some of the batter (dough??) to stick the parchment-paper down to the pan, even though the original recipe didn’t call for parchment, but a greased pan. Anyway, the bit that was directly on the pan was way crispier than the one on parchment, so I noted that in the Semprit Sagu recipe.
This blog is all about my fails and success in baking, and I think I proved something yestereday:
It’s the SIMPLE ones I’ll mess up on. I can do fancy Creme Brulee and delicate Chocolate Mousse, but I can never underestimate a dessert.
After the first cookie sale, (which, as you might remember, was when we sold out) we decided to hold another sale a week later. I didn’t want to run out of meringues again, so I baked over 100 cookies. I was selling them in bags of 10 for a dollar, because they’re small. Guess what? They didn’t sell. Avery made some Peanut Butter and M&M Blondies, Isabel made some Sugar Cookies (which were hard as rock) and I made lots of meringues. Aubrey and I stood by the cookie stand and Avery and Isabel fiddled with the sign. I sold 2 bags of Blondies and some Sugar Cookies. That was all. I won’t go into detail about how many hours we waited for someone to stop by. I wondered why we weren’t selling, even though our product was still great. It might have been because nobody was actually sitting at the sign and we were eating all the cookies, or it might have been that nobody could see the sign, because they were driving too fast. Or it might just have been a bad day.
Although I didn’t know it at the time, sales were low because of the Coronovirus. I figured it out when Aubrey commented on this site a month later wanting me to email her about the stand.
And I replied explaining that the virus was the thing that made our sales low, along with a few other points, and told her that while the virus was going on I would make my parents and siblings fat.
And so I found this recipe and stuck true to my email . (Note*** Double the recipe if you want a nice, tall cake.***)
Cardamom Spiced Carrot Cake with Ginger Frosting & Caramel Drizzle
Preheat oven to 350°F. Grease and line three 6″ cake pans with parchment paper.
In a large bowl, mix together sugar, coconut oil, eggs, milk, and vanilla extract.
In a separate bowl, combine flour, baking powder, cardamom, ginger, cinnamon, and salt. Carefully fold dry ingredients into wet until mostly combined.
Fold in carrots and shredded coconut. Distribute batter evenly into prepared pans (1 1/3 cups of batter per pan).
Bake for 30 minutes, or until a knife inserted in the center of the cakes comes out clean. Allow to cool completely before frosting.
MAKE THE CARAMEL
Make the caramel while the cake is baking. In a medium saucepan, heat the sugar on medium-low heat for about 5 minutes. Use a spatula to occasionally stir the sugar, getting to the bottom of the pan.
Once the sugar is fully melted and turns a medium gold hue, remove from heat immediately and stir in butter. The mixture will violently bubble. Use your spatula to stir the butter and sugar until they melt together completely.
Next, pour in the heavy cream. Use your spatula to stir until everything is combined. Place back on the stove for about 30 seconds, stirring the whole time. Remove from heat and allow to cool for 15 minutes.
MAKE THE FROSTING
To make frosting, whip butter and cream cheese in a standing mixer on high speed for 1 minute. Lower speed and add in powdered sugar, ginger, salt, and vanilla extract, mixing until combined.
Place the first layer of cake onto a cake stand, then top with a heaping 1/2 cup of frosting. Spread to edges, smoothing evenly. Repeat with second and third layer.
Add remaining frosting to sides of cake, then use a cake scraper or flat cake knife to smooth frosting out around edges.
Pour caramel around outside crown of the cake, using a fork to help pull drippy bits down the cake. SERVE!
It turns out you can never say you’ve mastered something. It’s bad luck. No matter how many fails or how many successes, you can never be perfectly sure that you’ve mastered it.
Once upon a time, I made creme brulee and had a lot of whites left over. I really wanted to make something with the whites instead of letting Mom use them for scrambled eggs. After we googled some recipes, I decided to make meringue cookies. I added a little sugar, cream of tartar (is it pronounced Tar-tar, or TAR-ter?) and the egg whites. I beat them up with a hand mixer and made this fluffy, super light and supercalifragilisticexpialidocious (aka wonderful) meringue. I piped it out with a star tip, and baked them at 200 degrees F. I baked them for 50 minutes and they came out BEAUTIFULLY! They were crunchy if you chewed them and melt-in-your-mouth. Luckily, I saved some to bring to church for lunch, since it was Saturday when I baked them. People (aka the kids at church, because they were all gone by the time the grownups got them) loved them. One person (Lily) asked how I made them and I said “I beat egg whites, sugar, and cream of tartar and-” she stopped me right there and said “Oh, we can’t do that. My mom only buys brown eggs.” 🤣
Turns out, it was just chance that it turned out right.
The next time we made them, I decided to make a lot because we loved them so much last time. Instead of the hand mixer, I used the stand mixer. A number of things went wrong with this batch. First of all, I didn’t know that it had to be the whisk and accidentally used a paddle attachment! What an amateur mistake! Except, at that time, I was an amateur.
Because it wasn’t whipping, I thought I hadn’t added enough Cream of Tartar. So I added more. Another amateur mistake.(cream of tartar is an acid????) As you might expect, it became really sour!🤢 So I decided to make them lemon meringues! (Honestly, I didn’t know what lemon meringue pie was, so I didn’t know that the pie was lemon, not the meringue) So I squirted some lemon juice inside. And it became worse.
Luckily, my siblings don’t care as much about the sourness as I did, so they still ate them.
After googling more recipes, I found out that some meringues don’t use cream of tartar, so I changed my recipe. This worked out pretty well, but the meringue was foamy instead of creamy??!! I dunked it, but after googling some MORE, I found out that I just had to keep mixing! Frustrated with this simple dessert, I stopped trying meringues for a while.
What it should look like
A little like what mine looked like
Months later, I tried meringue again and somehow, it worked! 😲 No sourness, it was creamy, and supercalifragilisticexpialidocious. (I love that word!)
Soon after that success, our next-door-neighbor asked us to help her with her “bake sale” AKA a cookie stand set up in her front yard. I knew meringues took a long time to bake, but I also knew that if we were selling them, I better had bake a lot! Unfortunately, I hadn’t found out that meringue doesn’t last that well at room temp, and it becomes foamy and unpleasant. It can’t hold the star tip’s design or even stay in pretty little mounds. So I had only a few successful meringues, and that was the ONLY cookie stand bake sale that we ever sold out.
Well, after more and more googling, and more and more testing, I have still not perfected meringues. Did you know that if you haven’t baked them long enough, at room temp they’ll get all sticky and melt? This is my warning list for meringue:
Make sure you’ve got the whisk attachment!
Make sure that there’s NO yolk in your egg whites
DON’T PUT TOO MUCH CREAM OF TARTAR!
Make sure to bake them long enough, and at a really low temp. These bake low and slow! If you try to speed it up by firing up the oven to 350, you’ll end up with brown-ish meringues that are still gooey inside.